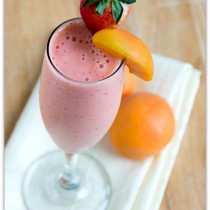
Cookies ‘n Cream Cupcakes

Pinterest

Wow was today one of those “am I off yet?!” workdays. But, this isn’t a pharmacy blog so I won’t rant about my awful day at work! Coming home to these amazing cookies and cream cupcakes I made from scratch for everyone at work made everything so much better. I put on my sweats, clipped my hair up and sat on the couch to eat a big, fat yummy cupcake and everything was right in the world again. I made them with my homemade vanilla cupcake recipe. What’s your favorite comfort food?? XoXo

Cookies ‘n Cream Cupcakes
 
Prep time

Cook time

Total


Type: Dessert
Serves: 24

Ingredients
Cupcakes
  • 1 cup unsalted butter, softened
  • 2 cups granulated white sugar
  • 4 eggs
  • 2 tbsp vanilla extract
  • 3 cups all-purpose flour
  • 1 tsp baking powder
  • ½ tsp salt
  • 1⅓ cups cold milk
Cookies ‘n Cream Frosting
  • ½ cup unsalted butter, softened
  • 3 cups confectioners’ sugar
  • 1 cup ground Oreo cookies + extra cookies for decorating
  • 2 tbsp half and half (sub milk)
  • ½ tsp vanilla extract

Instructions
Cupcakes
  1. Preheat oven to 350 degrees F.
  2. Whisk together flour, salt, and baking powder in a large bowl and set aside.
  3. Cream butter and sugar together in a standalone mixer with paddle attachment (or electric hand mixer).
  4. Add eggs, one at a time until blended.
  5. Add vanilla and beat on medium just until blended, then turn to low speed.
  6. Add flour mixture a little at a time until all of it is blended in. Mixture will be very thick.
  7. Add cold milk and set mixer to “stir” setting, or the very lowest setting possible.
  8. Once you have a homogenous mixture, use a large spoon to scoop batter into a prelined cupcake pan, filling each cup ⅔ full.
  9. Bake about 25 minutes, until toothpick comes out clean.
  10. Remove immediately and place onto a cooling rack to cool before frosting.
Frosting
  1. Grind Oreo cookies in a food processor until fine.
  2. Cube butter and place in standalone mixer bowl.
  3. Using the whisk attachment, whisk butter, vanilla, and 1 cup of sugar and 1 cup finely grounded up Oreo cookies together on medium speed until smooth.
  4. Add remaining sugar and 2 tbsp half-and-half.
  5. Whisk on medium to high for a few minutes until frosting is smooth.
  6. Add frosting to a cake decorating bag fitted with desired tip (do not choose one that is very narrow, such as a narrow star tip, because the cookies make the frosting have a thicker texture and you will have trouble squeezing it out).
  7. Chop cookies in fourths and top frosted cupcakes to finish.
Makes 2 cups

Nutrition Information
Serving size: 1 Calories: 331 Fat: 12g Sugar: 33g


This post is sponsored by:

Share and Enjoy

Pinterest

Roasted Rosemary Chicken with Mushrooms

Pinterest

Today was the first time I used a cast iron pan! I bought one many months ago on Amazon.com because I decided to move away from using non-stick pans because of all of the health discussion going on. Cast iron pans are supposedly healthier than most non-stick cookware available today (and also more durable for that matter-those things last forever!), so I thought I would buy one and try it out. For reasons unknown (probably just scared of the thing after reading all of the “don’ts” that were written on the packaging) it has been sitting in my cupboard ever since it was delivered to me! So why all of a sudden today? Well, I was searching for a chicken and mushroom recipe since I have an excess of mushrooms in the refrigerator and I came across one from Tyler Florence that uses a cast iron pan! The only problem was that I didn’t season mine yet, so I had to do that for an hour before I could start cooking dinner. I chose this recipe specifically to make for Fabi tonight, because he likes mushrooms. I can’t stand them! I used to think they were one of the most disgusting things one could eat, and I just did not like their texture. I have been forcing myself to try them here and there with different recipes, and found that they aren’t so bad afterall. They still aren’t my favorite, but at least I can tolerate them now! I learned that you shouldn’t wash them with water when preparing them for cooking because they absorb a lot of water. Instead, use a brush to scrub them clean over a paper towel, and cut off any “bad” parts. I was very pleased with this recipe, but would like to try and add some freshly minced garlic next time I make it…yumm!

Recipe adapted from Tyler Florence’s Pan-Roasted Chicken with Mushrooms and Rosemary.

Roasted Chicken with Mushrooms
 
Prep time

Cook time

Total


Type: Main
Serves: 2

Ingredients
  • 2 boneless chicken breasts, each sliced in half
  • Salt and black pepper for seasoning
  • 2 tbsp olive oil
  • 8 fresh white mushrooms, sliced
  • 2 shallots, halved
  • 3 tbsp fresh rosemary sprigs (can sub dry)
Sauce
  • ¼ cup water
  • ½ lemon, juiced

Instructions
  1. Preheat the oven to 350 degrees F.
  2. Brush mushrooms to clean and slice them (not too thin). Set aside.
  3. Season the chicken on both sides with salt and pepper.
  4. Place a cast-iron skillet on the stove over medium heat.
  5. Add olive oil and once hot add the chicken breasts.
  6. Cook for about 5 minutes, then toss in the mushrooms, shallots, and rosemary.
  7. Place skillet in the hot oven and roast for 15-20 minutes, until the chicken is cooked (can remove at 15 minutes to check inside for doneness). Do not overcook or chicken will be dry. If you don’t have a cast-iron skillet, use a regular skillet for stove-top part then transfer to oven-proof bakeware.
  8. Remove everything from skillet and arrange on a serving tray. Keep warm while preparing the sauce (can place in a warm oven, 200 degrees F).
  9. Pour out all but 1 tablespoon of the leftover juices from the skillet and return to stovetop over medium heat.
  10. Stir in the water and lemon juice, scraping the skillet with a wooden spoon.
  11. Cook about 5 minutes, then drizzle over the dish.
  12. Serve with vegetables and rice or mashed/baked potatoes.

 
This post is sponsored by:

Share and Enjoy

Pinterest

Creamy Garlic Mashed Potatoes

Pinterest

This morning I got up at 7am and went on a run through foggy Presidio Heights. I was proud of myself because whenever I attempt to set my alarm early enough to get a run in before the day starts, I usually shut it off and go back to sleep. I am glad I got myself out of bed this morning because it felt great! There were many people already out and about running or walking their dogs. I have to leave for work soon, but I wanted to post this recipe for homemade creamy garlic mashed potatoes because I made them yesterday for lunch and they turned out really yummy! This recipe is adapted from Alton Brown’s garlic mashed potatoes recipe, but I tried to make it a little lighter and I added some garlic salt and some parsley in the end for extra flavor. I served it with German meatballs (recipe to come soon!) and the two went great together. Happy Tuesday! XoXo

Recipe adapted from Alton Brown’s Creamy Garlic Mashed Potatoes Recipe, 2004.

Creamy Garlic Mashed Potatoes
 
Cook time

Total


Type: Side
Serves: 4

Ingredients
  • 4 medium russet potatoes
  • 2 tsp garlic salt
  • 1 cup half-and-half
  • ½ cup milk
  • 4 cloves fresh garlic, minced
  • ½ cup freshly grated Parmesan cheese
  • Parsley for garnish

Instructions
  1. Boil potatoes for about 40 minutes, until a fork easily pokes through.
  2. Once cool enough, peel skins off and place cover back on pot.
  3. In a medium saucepan, add half-and-half, milk, garlic, and garlic salt and bring to a gentle boil over medium heat while stirring.
  4. Once bubbles begin to form, reduce heat to low and stir occasionally to thicken.
  5. Add sauce and Parmesan cheese to potatoes in original pot and mash with a potato masher until creamy and well blended.
  6. Add more milk if needed.
  7. Serve warm and sprinkle with fresh parsley.

 
This post is sponsored by:

Share and Enjoy

Pinterest

Artichokes and Hollandaise

Pinterest

Today was the San Francisco Golden Gate Bridge’s 75th anniversary birthday, and there have been festivities going on all day long. Fabi and I walked down to what we thought would be a secret viewing spot for the firework show at 9:30pm taking place over the bridge, but about halfway there we noticed the crowd of people getting larger and larger, with people coming from every direction all headed towards ours… I guess out secret view of the golden gate bridge in the Presidio was not a secret afterall, but it was still much better than 4th of July last year at Fort Mason (we couldn’t even walk it was so packed!). We ended up having a lovely view of the fireworks, and my android pic doesn’t do the incredible 20 minute show justice.

Did you know that I love artichokes? I put artichoke hearts in my pasta, in pizza pockets, and love them in salad. They are sooo goood. I think they make a really fun appetizer too. I remember the first time I had them…my aunt made them for a family gathering and I had no idea how to eat them until she taught me how! The only problem is that they aren’t very filling…after a whole artichoke I am usually still not satisfied. However, this is one reason they make a great appetizer or snack that won’t fill you up before dinner! I want to experiment with different sauces to dip them in. Once at a restaurant we went to in Lake Tahoe they served this appetizer with a garlic sauce that was amazing. Hollandaise sauce is always a classic choice for the dip, and I think the lemon flavor is a nice pair with artichokes (also asparagus, yum!). I know it ruins the “healthiness” of artichokes because it is so fattening, but it tastes so yummy! Whoever came up with combining egg yolks and butter in the same sauce was clearly trying to kill someone with a heart attack. An easier/faster artichoke dip is just melting some butter and adding lemon juice and freshly minced garlic – YUM. Next time I want to try grilled artichoke, because I have only tried cooking them by boiling so far. Happy Memorial Day, what are you doing to celebrate? I am planning on a relaxing day at home.

Artichokes and Hollandaise
 
Prep time

Cook time

Total


Serves: 2

Ingredients
Hollandaise Sauce
  • 2 egg yolks
  • ½ tbsp freshly squeezed lemon juice
  • ¼ cup unsalted butter (1/2 stick)
  • Pinch salt
  • Pinch cayenne pepper
Artichoke
  • 2 artichokes
  • 1 tbsp olive oil
  • 1 tbsp lemon juice
  • 1 garlic clove, chopped into 4 pieces
  • ¼ tsp salt
  • 1 quart of chicken broth (water will work as well)
  • 2 bay leaves

Instructions
Hollandaise Sauce
  1. Whisk or stir the egg yolks and lemon juice together rapidly with a wooden spoon in a small saucepan with no heat.
  2. Turn heat on to the lowest setting possible, and continue to whisk rapidly.
  3. Add ⅛ stick of butter (half of what you start with) and continue to whisk until melted.
  4. Add the other half of the butter and continue to whisk until the sauce is thickened and doubled in volume.
  5. Remove from heat and whisk in the pinch of salt and cayenne pepper.
  6. Cover and let stand until ready to serve (makes about ½ cup).
Artichokes
  1. Fill a large pot with chicken broth (or water) and bring to a boil.
  2. Add olive oil, salt, lemon juice, bay leaves and garlic pieces.
  3. Trim artichoke stem off and any discolored/hard leaves at the bottom, and trim the top off about1 inch.
  4. Rub all over with fresh lemon juice to prevent discoloration.
  5. Place each artichoke sitting upward in the boiling water.
  6. Cover and turn the heat down to low. Simmer for 30-35 minutes, until a knife easily pierces the bottom. Turn artichokes occasionally (I turn mine upside down after 10 minutes, then back at 20 minutes).
  7. Drain and let cool.
  8. Peel off leaves and arrange on a dish, with hollandaise sauce in the middle for dipping.

This post is sponsored by:

Share and Enjoy

Pinterest

Baked Roasted Vegetable Pasta

Pinterest

Yesterday I got to counsel my first transplant patient on immunosuppressant medications. It is one thing to learn about all of the drugs in class, but to get to speak to someone face to face who is actually going through the disease state you learn about is another. Up to this point, I have gotten pretty good at counseling on over-the-counter remedies, how to use an inhaler, smoking cessation, and how to test blood glucose, but it seems like pharmacy school is getting more and more challenging as we are starting to study more complicated disease states. This week’s topic was “heart failure”, and I am still trying to untangle the crazy treatment algorithm and which patients should or should not receive which medications. I hope I can manage to learn everything before the final exam in a few weeks :/

After I got home from the gym today I was craving something with tons of fresh vegetables…this baked roasted vegetable penne pasta recipe seemed perfect since I had a lot of vegetables I needed to use up in the refrigerator. It is made with red bell pepper, artichoke hearts, onion, zucchini, and tomatoes that are drizzled with olive oil and then roasted in the oven before being tossed with slightly cooked penne noodles, cheese, and baked in the oven. The flavors are incredible and each bite tastes so fresh.

Off to do the huge laundry pile I have been avoiding all day! XoXo

Baked Vegetarian Pasta
 
Prep time

Cook time

Total


Type: Main
Serves: 2

Ingredients
  • 1 red bell peppers, diced
  • 1 zucchini, cut into ¼ quarter pieces
  • 1 tomato, sliced
  • ¼ yellow onion, minced
  • 2 tbsp olive oil
  • ½ tsp black pepper
  • 2 tsp dried Italian herbs
  • 2½ cups penne pasta
  • 1½ cups marinara sauce
  • ½ cup shredded mozzarella cheese
  • Fresh Parmesan cheese for topping

Instructions
  1. Preheat oven to 425 degrees F.
  2. Wash and slice all vegetables and toss into a large bowl.
  3. Add olive oil, pepper, and Italian herb seasoning and mix well.
  4. Spread out on a baking sheet and bake for 15 minutes, careful not to burn (can turn over halfway though).
  5. In the meantime, bring a pot of water to boil and boil penne pasta for about 5 minutes and then drain immediately.
  6. Toss roasted vegetables with pasta in the same bowl used earlier, and add mozzarella cheese and marinara sauce and stir well.
  7. Transfer to an 8×8 baking dish and top with freshly grated Parmesan cheese.
  8. Bake for 20-25 minutes at 425 degrees F.

 
This post is sponsored by:

Share and Enjoy

Pinterest