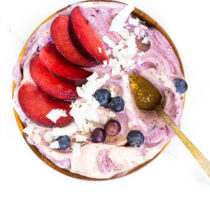
Apricot Arugula Pizzettes

apricot arugula pizzetteThis week I started a new 6-week block of pharmacy rounds, and today I got to do my first hospital discharge medication consultation. It was so rewarding! I have a really short lunch break, so I have been needing to think of fast recipes for lunch every day. I should just get up early and make something in the morning, but that never happens!

This apricot arugula pizzette recipe is one of my favorite lunch recipes because the combination of flavors is incredible, and it is pretty quick to make! It is made with fresh apricots, arugula, crumbled goat cheese and carmelized onions with herbs. It is light, yet very satisfying! I just love healthy lunch recipes like this one :)

apricotscarmelize onions


Apricot Arugula Pizzettes
 
Prep time

Cook time

Total


Type: Main
Serves: 2

Ingredients
  • 2 pieces of whole wheat flat bread
  • 3 tbsp olive oil
  • 2 apricots, pitted and quartered
  • ½ cup fresh arugula, rinsed and strained
  • ⅓ cup crumbled goat cheese
  • ¼ onion, thinly sliced
  • ¼ tsp thyme
  • Salt and pepper to taste

Instructions
  1. In a small skillet over medium heat, add 1 tbsp olive oil.
  2. Add the onions, thyme, salt and pepper to taste.
  3. Stir over a few minutes until the onions turn translucent and a brown color (do not burn!).
  4. Remove from heat and set aside.
  5. Preheat oven to 400 degrees F.
  6. Spread 1 tbsp olive oil over each flat bread, then top with carmelized onions, apricots, and crumbled goat cheese.
  7. Bake in the oven for 5 minutes, then remove and top with fresh arugula and pepper to taste.
Makes 2 6-inch pizzettes


Share and Enjoy

Pinterest

Chia Seed Chocolate Pudding

chia seed puddingI apologize in advance for the terrible photos in this post. Yes, I took them with my phone. This is what happens when I leave the house without my DSLR, but NEED to share an amazing recipe with you guys (and too lazy to recreate it within a decent amount of time). We went to BBQ at a friend’s, and for dessert he proposed making chocolate pudding – made with chia seeds! I must admit, I haven’t used chia seeds in any of my recipes ever, but apparently they have been deemed THE health food of 2013. They are the new flax seeds, with even better omega 3 to 6 ratio, fiber and protein content. We were all laughing because on the chia seed bag it states, “Aztec Superfood,” but it seems like they are sort of a superfood.

This chocolate pudding is gluten-free and vegan, and it tastes really good! The texture wasn’t exactly what I hoped for (it isn’t as smooth and creamy as traditional chocolate pudding), but the flavor was delicious! Add fresh fruit on top before serving.

Have you jumped on the chia seeds bandwagon yet? What recipes do you use them in?

chia seed puddingchia seed pudding mixchia seed pudding with berries

5.0 from 2 reviews

Chia Seed Chocolate Pudding
 
Prep time

Total


Type: Dessert
Serves: 2

Ingredients
  • 1 can coconut milk
  • ⅓ cup chia seeds
  • 3 tbsp unsweetened cocoa powder
  • 1-2 tbsp honey (or desired sweetener)

Instructions
  1. Soak chia seeds in coconut milk.
  2. Stir every 5 minutes for a total of 30 minutes.
  3. Add the remaining ingredients and stir well.
  4. Chill in the refrigerator prior to serving for best results.


Share and Enjoy

Pinterest

Lemon Rosemary Tilapia Amandine

tilapia amandineDid you know that I used to hate fish? Before I met my husband, I swore I would never eat it. Of course, with his love for fish, I eventually found myself trying a light, white fish in Malibu, CA and completely loved it. I was immediately fascinated with the many ways one could decorate fish – herbs, garlic, lemon, tomatoes, nuts – it seemed endless. One of my favorite fish to experiment with is tilapia, because the flavor is not very fishy. This allows you to add almost anything you want and it will always come out great! This weekend I made lemon rosemary tilapia with garlic and slivered almonds on the top (I learned garnishing something with almonds is called “amandine” – isn’t that a pretty word?). I love that this recipe is so easy and fast to make, it is perfect for any night of the week! I like to serve this tilapia dish with a side of vegetables and potato wedges or jasmine rice.

This morning I woke up to many of my neighbors leaving at an early hour, including my husband, to go watch the annual San Francisco “Bay to Breakers” race/celebration. Apparently it gets pretty crazy here, but I had enough of that during my college years so I preferred to sleep in on my Sunday :) Does that make me sounds old? I think it does!

What are you plans for the day?

rosemary-tilapia-1rosemary-tilapia-2rosemary tilapia

5.0 from 3 reviews

Lemon Rosemary Tilapia Amandine
 
Prep time

Cook time

Total


Type: Main
Serves: 2

Ingredients
  • 2 tilapia fillets, defrosted
  • 2 tbsp olive oil
  • ½ lemon
  • 2 cloves garlic, minced
  • 2 tbsp fresh rosemary, chopped
  • ¼ tsp salt
  • ¼ tsp pepper
  • 2 tbsp slivered almonds

Instructions
  1. Preheat a toaster oven or oven to 325 degrees F.
  2. Line a baking sheet with aluminum foil and grease with olive oil, using a brush or your fingers.
  3. Place the two tilapia fillets on the baking sheet.
  4. In a small bowl, add the juice from ½ lemon, freshly grated lemon zest from the ½ lemon, olive oil, minced garlic, rosemary, salt and pepper. Stir well.
  5. Evenly distribute between the two fillets, using a brush to completely cover them with the lemon mixture on one side.
  6. Bake in the oven for 10 minutes, then quickly remove and top each fillet with 1 tbsp slivered almonds.
  7. Set the oven to broil, and broil for a few minutes – make sure to watch carefully because you want the almonds to be slightly browned but not burnt!
  8. Garnish with lemon slices and fresh rosemary on top, then serve immediately.
Makes 2 fillets


Share and Enjoy

Pinterest

Homemade Cherry Lemonade

cherry lemonadeIt’s Friday, and I should be happy, but I’m not. Today marks the end of my week off from pharmacy rotations, and I don’t have another break for a really long time! It went by too fast, since I was busy cleaning and catching up on other things I didn’t get to during my last rotation. I was thinking about going on a picnic this weekend, if the weather is nice. Earlier this week I made this organic homemade cherry lemonade with some fresh organic cherries my friend gave to me. This is the perfect drink to take along on a picnic! Don’t you love the color? It comes out to be a bright pink lemonade. It is really easy to make: just add lemons, ice, water, sugar and pitted cherries to a blender and you get a nice, foamy top! I don’t like my lemonade too sweet, so by making it at home I am easily able to control the amount of sugar. Make small adjustments, because just like with spice, you can always add more, but never take away. I never like to make too much because I always want it freshly made, so this recipe only makes enough for two servings. You can double or triple it for more!

Today is the 26th wedding anniversary of my parents. Congratulations Mom and Dad, I love you!

organic cherries

Homemade Cherry Lemonade
 
Prep time

Total


Type: Drinks
Serves: 2

Ingredients
  • 3 tbsp granulated sugar
  • ¼ cup lemon juice (~2 lemons)
  • 1½ cups cold water
  • ¾ cup ice
  • 6 organic cherries, stemmed and pitted

Instructions
  1. Place all ingredients in a blender and blend for 30 seconds.
Makes 2 cups


Share and Enjoy

Pinterest

Chocolate S’more Cookies

s'more cookiesWhat happens when you crave s’mores and chocolate cookies at the same time? S’mookies happen. Yes, I am totally coining this term! Soft, fudgy, chocolate cookies bursting with gooey chocolate chips, crispy graham cracker pieces and marshmallows = s’mookies. Just as a disclaimer before you go on reading, there is absolutely nothing healthy about these cookies. This just so happens to be one of those dessert attacks I get every once in a while and bake something majorly fattening and bad for you, but oh-so-good!

I made these for the first time, so it was sort of an experiment. Unfortunately, the marshmallows melted in the oven when the cookies were baking, so that fluffiness factor was pretty much non-existent when they were done :/ Solution: about two minutes before taking them out of the oven, pop a few marshmallows on top, pressing them in the cookies. This would be very tedious for a large batch, but I don’t know a better way to do it.

By the way, did you know that s’mores are an American thing? Well, according to Wikipedia, it is a Canadian thing too. My German husband never heard of them before seeing them for the first time when we were in Tahoe last year sitting by a campfire. I was shocked!! How can any child grow up without s’mores?! OK confession time: in college I kept a box of graham crackers, a bag of marshmallows and chocolate around at all times in case I had a s’more attack. The microwave is actually a fairly decent substitute for a campfire.

OK, here is a question for my non-American, non-Canadian friends out there: did you eat s’mores growing up?

Oh, and since Google Reader is on its way out, I just got Bloglovin! Follow my blog with Bloglovin

s'more cookie batters'more cookie doughs'more cookies

5.0 from 2 reviews

Chocolate S’more Cookies
 
Prep time

Cook time

Total


Type: Dessert
Serves: 24

Ingredients
  • ½ cup butter (1 stick, room temperature)
  • ½ cup white sugar
  • 1 egg
  • 1 tsp vanilla
  • 1 cup all-purpose flour
  • ⅓ cup unsweetened cocoa powder
  • ¼ tsp baking soda
  • ¼ tsp salt
  • 1 cup semi-sweet chocolate chips
  • 1 cup chopped graham cracker pieces
  • 1 cup miniature marshmallows, divided

Instructions
  1. Preheat oven to 350° F (175° C).
  2. In a mixing bowl, beat room temperature butter, sugar, eggs, and vanilla until creamed together.
  3. In a separate bowl, mix flour, cocoa, baking soda, and salt with a fork.
  4. Add flour/cocoa/baking soda/salt mixture a little at a time into butter/sugar/eggs/vanilla mixture by beating at low speed until well blended.
  5. Mix in chocolate chips, graham cracker pieces and ½ cup mini marshmallows by hand.
  6. If oven is still preheating, let chill in refrigerator for a few minutes (I find this helps the cookies keep their shape).
  7. Using a teaspoon, drop batter onto cookie sheets, leaving an inch around each cookie drop. You can stick in chocolate chips and graham cracker pieces onto the tops to make them “prettier.”
  8. Place into oven and bake for 6 minutes, then quickly press the other ½ cup marshmallows into the tops of the cookies.
  9. Bake for another 2-3 minutes, then remove from the oven.
  10. Let cool 2 minutes before transferring to a cooling rack.
Makes 24 cookies


Share and Enjoy

Pinterest