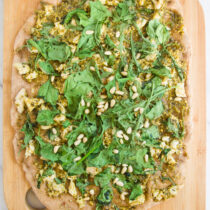
Light Cookie Frap

Pinterest

cookie frap

On Fridays I usually treat myself to a Frappucino® after a long week. Fraps are one of those treats I always feel so guilty about, and try to limit how often I drink them. Why not try the “light” version you ask? Well, I can’t stand artificial sweeteners, it just ruins the whole drink for me. Today I decided to make my own homemade light cookie frap. Yes, I might have overdone it with the whipped cream and chocolate syrup, so it wasn’t really “light” after I was done with it…but the recipe itself (without the whipped cream and chocolate syrup) has much less sugar than traditional fraps, and taste way better than the light kind you buy at coffee shops. One 8-oz frap only has 40 calories, and 11g of sugar! That means you can even throw in another chocolate sandwich cookie in there ;) Enjoy this almost guilt-free blended beverage and your Friday! Cheers!

light frap

Light Cookie Frap
 
Prep time

Total


Type: Drink
Serves: 2

Ingredients
  • 1 cup ice
  • ¼ cup non-fat milk
  • ¾ cup strong coffee
  • 1 chocolate sandwich cookie (plus more for topping!)
  • 1 tbsp granulated sugar
  • Whipped cream and chocolate syrup for topping (optional)

Instructions
  1. Add all ingredients to a blender and blend.
  2. Top with whipped cream, chocolate syrup and crushed chocolate sandwich cookie pieces (optional).
Makes 2 8-oz fraps

Nutrition Information
Serving size: 1 8oz Frap (without whipped cream) Calories: 40 Fat: 1.6 Saturated fat: 0.5 Sugar: 11g Sodium: 36mg


Share and Enjoy

Pinterest

Currant Scones

Pinterest

currant scones

This recipe for currant scones is one of my favorite scone recipes. Even though I love chocolate and usually make scones with chocolate chips, sometimes it is a nice change to make them with fruit. Currants go very well in scones, and pairs nicely with jam in the mornings. They are best when heated up for 5 minutes in a toaster oven on 350F before serving. You can eat them plain, with butter, or with your favorite jam. I also like having them for an afternoon tea break! See also: Chocolate Chip Scones, Blueberry Scones

We just got back from our Spring skiing trip to Lake Tahoe, and it was so much fun! I love that it is only a few hours away from San Francisco to such a nice “getaway” location. Most of the snow was melted, but the lake looks breathtaking any time of the year.

emerald bay

We attempted a hike around Emerald Bay (see photo below), but two couples passed us warning of bear tracks so we turned back. With a backpack full of food on my back and knowing that the bears are waking up very hungry this time of year, we didn’t want to risk it!

currant scones with tea

5.0 from 2 reviews

Currant Scones
 
Prep time

Cook time

Total


Type: Dessert
Serves: 5

Ingredients
  • 6 tbsp unsalted butter, chilled and cubed
  • 1¾ cups all-purpose flour
  • ⅓ cup granulated sugar, plus extra for garnish
  • 1 tsp baking powder
  • ¼ tsp baking soda
  • ¼ tsp salt
  • ½ cup Nature Box Zingy Currants www.naturebox.com/
  • 1 egg
  • ⅓ cup sour cream
  • 2 tbsp milk
  • 1 tbsp orange juice

Instructions
  1. Preheat oven to 400 degrees F.
  2. In a large bowl, whisk together flour, sugar, baking powder, baking soda, and salt.
  3. In a food processor or in a large bowl using a pastry blender, cut the butter into the flour mixture until crumbly.
  4. Add the zingy currants and stir in with a fork.
  5. In a separate bowl, beat together the egg, sour cream, milk and orange juice. Pour over the ingredients in the other bowl and mix with a fork until the dough is moist and begins to hold together.
  6. Flour hands and gather the dough into a loose ball, then turn out onto a floured surface. Roll to about ¾ inch thickness.
  7. Cut out triangles and place on an ungreased baking sheet or a baking sheet lined with parchment paper.
  8. Sprinkle sugar over the tops of the scones.
  9. Bake for 13-15 minutes, or until scones become golden-brown and firm to touch.
  10. Transfer to a cooling rack. Serve warm
Makes 10 scones


Share and Enjoy

Pinterest

Mediterranean Quinoa Salad

Pinterest

Mediterranean saladWe are off to Tahoe! I actually packed everything on time for once in my life so hopefully we can leave before the Friday traffic hits SF! I’m serious, do not try to leave San Francisco on a Friday evening via the Bay Bridge…ever! It gets nasty. Before I go, I wanted to leave you with this healthy Mediterranean quinoa salad. I love roasted artichokes and tomatoes, but I love them even more in a salad! I have been obsessed with quinoa lately (you should see how many boxes I have stocked in my pantry!), it is just so much fun experimenting with different quinoa recipes. I couldn’t stop eating this salad, I just love the flavors. It really is one of those salads that make you stop after taking a bite and say, “MMMM” out loud. Or maybe it is just my quinoa and feta cheese addiction that makes me love this salad so much…

Oh, by the way, have any of you living in the Bay Area seen the Bay Bridge lights at night? I still haven’t gone to check them out! From the videos I have seen, I think what they did is so cool!

Have a happy Friday and great weekend!

5.0 from 4 reviews

Mediterranean Quinoa Salad
 
Prep time

Cook time

Total


Type: Salad
Serves: 2-3

Ingredients
  • 2 cups cooked organic white quinoa
  • 1 cup arugula, trimmed and rinsed
  • 1 can/jar artichoke hearts
  • 1 cup organic cherry tomatoes
  • ½ cup crumbled feta cheese
  • 3 tbsp olive oil, divided
  • Ground black pepper to taste

Instructions
  1. Preheat oven to 375 degrees F.
  2. Slice cherry tomatoes and artichoke hearts in half and add to a large mixing bowl.
  3. Add 1 tbsp olive oil, and pepper and mix well.
  4. Spread over a baking sheet and bake for 15-20 minutes.
  5. Add quinoa, arugula, feta cheese and roasted vegetables to a large mixing bowl.
  6. Drizzle olive oil over the salad and sprinkle desired amount of ground black pepper over the salad.
  7. Toss everything together before serving.
Makes 4 cups


Share and Enjoy

Pinterest

Vegetarian Stuffed Peppers

Pinterest

vegetarian stuffed pepper

Ever since I started eating less meat, I have been experimenting with recipes that traditionally include meat by trying to make them vegetarian-friendly. I used to love stuffed bell peppers growing up, but these days I prefer making them without the ground beef. Instead, I use rice, black beans, tomatoes, pistachios (for a good protein source), and cilantro. Sometimes I will add corn in as well. The combination of flavors are incredible. I used chili lime pistachios from NatureBox, which pack a huge amount of flavor, so without them you will probably need to add some spices to the mix (think cayenne and lime juice). Top them with a spoonful of light sour cream and enjoy!

In other news…It’s official! I am done with school after 20 years of studying. I can’t say I will miss those sleepless nights before exams, or having to give up weekends for studying instead of going on fun trips. I will miss other things about “student life,” but for the most part I am happy to start a new chapter in my life – clinical rotations! Next week is my Spring Break, so I will be vacationing somewhere (haven’t decided where yet).

What is your favorite thing about Spring?? I think mine is the beautiful weather and flowers!

5.0 from 1 reviews

Vegetarian Stuffed Peppers
 
Prep time

Cook time

Total


Type: Main
Serves: 2

Ingredients
  • 2 red bell peppers
  • 2 cups cooked brown rice
  • 2 tbsp olive oil
  • ½ cup NatureBox chili lime pistachios (www.naturebox.com)
  • ½ cup black beans
  • 1 roma tomato, diced
  • ¼ cup fresh cilantro
  • Light sour cream for topping

Instructions
  1. Preheat oven to 350 degrees F.
  2. Wash, dry and rub the outside of the red bell peppers with olive oil and wrap in aluminum foil.
  3. Place the bell peppers in the oven and bake for 15 minutes.
  4. In the meantime, add the cooked brown rice and olive oil to a large bowl and mix together.
  5. Add the chili lime pistachios, black beans, tomatoes, and cilantro. Stir well.
  6. Remove the bell peppers from the oven, keeping the oven on, and unwrap the aluminum foil.
  7. Slice each bell pepper in half and remove the white pulp and seeds.
  8. Set each half on a baking sheet lined with parchment paper and fill with the brown rice filling.
  9. Loosely cover the tops with one layer of aluminum foil to avoid too much browning of the tops (you can remove this 10 minutes before they are done if you want a crispy top layer!).
  10. Bake for 20 minutes.
  11. Serve warm and top with light sour cream and cilantro.
Makes 4 stuffed bell pepper halves


Share and Enjoy

Pinterest

Broccoli Walnut Pasta

Pinterest

Broccoli walnut pasta

Of course the day before my final exam the weather is beautiful in San Francisco… I’m talking, perfect California beach day. Depending on who you talk to here, this weather is rare or not (people who live in the Mission district see the sun a lot more than the rest of us!). To me, a day like this is rare – the few “summer days” I will get in San Francisco! Hopefully it will stay like this after my finals are over so I can enjoy the sun.

Happy St. Patrick’s Day! As you can tell, I am stuck inside studying all day instead of celebrating. Are you doing anything special today? In honor of St. Patrick’s Day, here is a green, healthy recipe for you – Broccoli Walnut Pasta tossed with olive oil, garlic, zucchini ribbons and Parmesan cheese. Before this recipe, I never experimented with adding nuts to pasta. I usually add them to my salads, but never pasta. I loved the flavor and texture the walnuts gave to this dish! You can toast them in a toaster oven for a few minutes, or in the skillet with the rest of the ingredients to enhance their flavor. I kept it simple in this recipe and just added them in raw.

I hope you are having some of this fantastic Spring weather and are able to enjoy it!

5.0 from 3 reviews

Broccoli Walnut Pasta
 
Prep time

Cook time

Total


Type: Main
Serves: 2

Ingredients
  • 2 cups uncooked fusilli pasta
  • 1 head organic broccoli
  • 4 tbsp olive oil, divided
  • 1 organic zucchini
  • 3 cloves garlic, minced
  • ½ cup chopped walnuts
  • ¼ tsp pepper
  • Parmesan cheese

Instructions
  1. Bring a large pot of water to boil and add fusilli pasta.
  2. Cook for the time written on the bag, usually around 7-10 minutes, until al dente. Once done, strain and set aside.
  3. In the mean time, heat olive oil in a large skillet over medium heat.
  4. Add the minced garlic.
  5. Use a vegetable peeler to peel off zucchini ribbons into the skillet. Cook for 6 minutes, stirring occasionally. Once done, turn heat to low to keep warm.
  6. Add the broccoli (you can change the water if you wish) to the boiling water and cook for 6 minutes, or until tender and dark green.
  7. Strain and chop into small, bite-sized pieces.
  8. Add broccoli to the skillet and stir everything together.
  9. In a large bowl, mix together the pasta, remaining olive oil, vegetables, walnuts, pepper and freshly grated Parmesan cheese.
  10. Serve warm.
Makes about 4 cups


Share and Enjoy

Pinterest